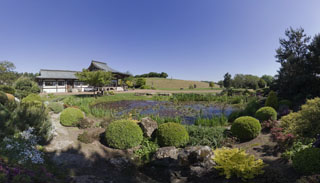
To create a panaorama which has subject matter within, say 50m of the camera it is necessary to rotate the camera around its
Point of No Parallax to avoid parallax errors. (That 50m is just a guess so don't hold me to that figure).
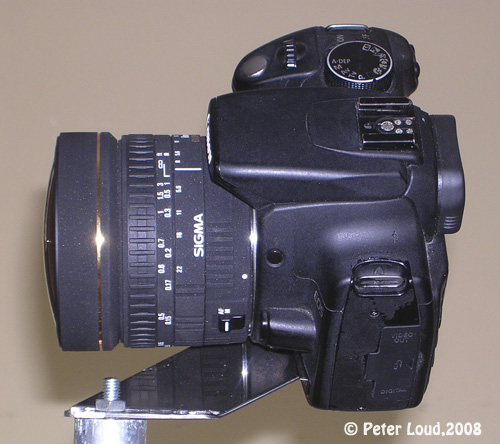
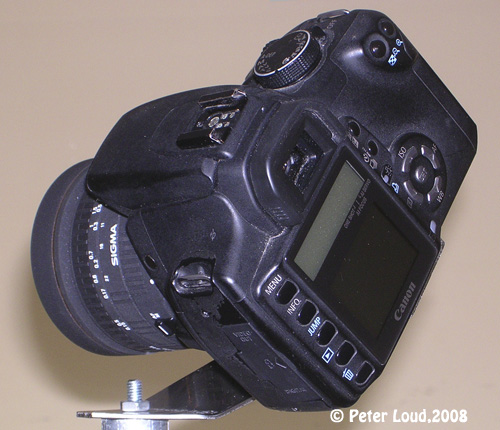
Generally speaking this point of no parallax, (nodal point or entrance pupil or whatever name, rightly or wrongly, people give to it),
is a little behind the front element of the lens. Rich people buy a commercial panoramic head which cost hundreds of $$,
smart people can make their own pano head bracket for under $3.
Unless you have an engineering machine shop at your beck and call your home made bracket will not look as good as a £185 Nodal Ninja NN3, or more expensive NN5,
and most other commercial products, but it'll do the job for about £2.
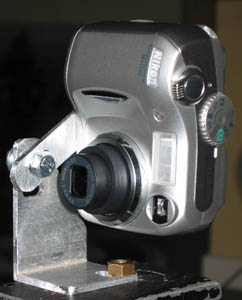
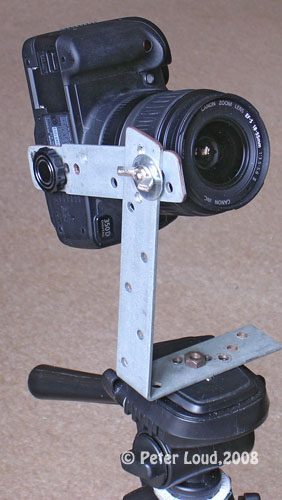
The pano head brackets I have made require little more than a few scraps of steel strip, a couple of nuts, bolts & washers and the ability to saw, file and drill metal. Oh, you also need a tripod with a panoramic head, because that's what you use for the rotation. For the first couple of brackets I made for my little 3Mp Nikon Coolpix 3100 I used some scraps of aluminium that I had lying around the garage. When I bought a Canon 350D I used some bits of galvanised steel I bought from my local builder's merchant. I shall not dwell on the earlier p.h. brackets I made for the Coolpix nor the more complicated bracket for taking landscape format photographs with the Canon. I assume people will want the easiest solution, and that is an "L" bracket with a swinging arm for taking photos in portrait format. |
![]() Sony a850 full-frame DSLR on Nodal Samurai |
![]() |
In 2006 I planned to buy a second-hand Canon 350D, my first DSLR, and a cheap tripod while passing through Singapore so I made
this rough and ready bracket from scraps before I left UK. Because I didn't have the camera & tripod
I had to guess the position of mounting holes so I drilled a few extra holes and made slots so that
I could slide the camera around on the bracket to get it positioned correctly. (The steel already had lots of
holes drilled in it before I started so it might look 'over-drilled'.
I found that the "L" bracket did an adequate job but was not sufficiently rigid.
This is what I used for the first panos that I took in Penang. |
I think that for many shots using the camera in landscape format is better.
There are fewer joins in the plane where there is most movement of the subject matter,
i.e. people walking left /right. Also there is a smaller range of distance
from camera to subject matter in narrower horizontal planes hence easier and better focusing,
i.e. you are less likely to get distant horizon and close up nadir objects in same view with lenses which are not ultra-wide.
|
![]() |
![]() |
Most makers of pano-heads use the vertical format because the weight of the camera
is closer to the panohead arms hence a lower load on the arms and less
movement. Having the camera in landscape format means the pano-head structure
would need to be stronger and vibration/movement would be greater, so most
manufacturers cop out and make them portrait only :-(
By having the camera supported at both sides the camera is held much more rigidly.
OK, it has the disadvantage of the pano-head bracket being bulkier :-(
and for many shots the portrait format is better.
|
This is just a refinement of that earlier portrait PH bracket for a DSLR.
I have used a heavier grade steel strap from the builder's merchant, for the "L" bracket
(this is why this PH bracket is so expensive ;-) (In these photographs I have used PhotoShop Clone Stamp
to remove the original holes in the steel strap to avoid confusion).
What made this so easy was that I knew from previous testing that the distance from the camera mounting bush to the nodal point for the standard Canon 18-55mm, at 18mm, lens was around 88mm. This meant that the swinging arm just needed two holes 88±2 mm apart. It not only made construction easy, but having holes not slots means that the camera can not be mounted out of position. |
![]() |
![]() |
![]() |
![]() |
The shot on the lower left shows the bracket folded for carrying. It is about 17cm long.
This picture shows my own personal de-luxe version ;-) The upper pictures show another which I made for a friend.
My de-luxe version has two holes in the swinging arm, one for the standard lens set at 18mm and another for
my Sigma 10-20mm set at 10mm.
The lower right shot shows the end of the swinging arm. It is necessary to incorporate a spacer so that there is clearance between the "L" bracket and the swinging arm for the head of the screw which fastens the camera to the arm. The hole through the spacer is tapped with a 6mm thread so that the bolt and spacer are locked together. This prevents the bolt slipping around when the wing nut is tightened. I also use another loose spacer between the camera and the arm when I use the Sigma lens, to give clearance between the fat lens body and the swinging arm. There are many ways this can be improved. I would liked to have used aluminium, but the builder's merchant didn't stock it :-( Apart from that I'm satisfied. If someone wants to give panoramas a try without having to blow $200 on specialist equipment this will do the job for under $5. Recently I made another pano-head bracket with the left-over scraps from the previous PHB. That has brought the cost down to under $2½ :-) I have also modified it by drilling three holes through the top of the 'L' bracket and the swinging-arm so that I can, by using a locking-pin, lock the arm in horizontal position or with a 47° upward elevation or 40° declination, which is ideal for panos with my Sigma 10-20mm lens set at 10mm. This allows me to make quicker and reproducible settings in the middle of taking a pano. |
Latest mods.A couple of days ago I decided to make a pano-head bracket for a friend.
It gave me the chance to make a couple of modifications. One modification is drilling three holes through the swinging arm and one through the top of
the 'L' bracket. This means I can lock the swinging arm horizontally, pointing up at 47 degrees or
down 40 degrees.
![]() OK, I need a better locating pin than a old pop-rivet. Don't be fooled by that
square 6mm nut. I bet some of you thought that it would be better to have a chunky knob.
No it isn't. Perhaps I should call it a design feature ;-)
If you live in UK, that bit of galvanised steel came from Travis Perkins the builder's merchant. I have also used full thickness steel for the swinging arm, because that was all I had left over. This allowed me to use a countersunk 1/4 BSW bolt for mounting the camera, therefore I didn't need a spacer at the top of the swinging arm. This might seem a little point but it reduces the torque and increases the rigidity of the system. However I do have to use a spacer between the swinging arm and the camera. I use a thin bit of wood sandwiched between two pieces of rubber from a truck inner tube. I filed a chamfer on the top end of the arm to give better clearance for the lens hood. ![]() |
Versatility & StrengthWhen I compare my PHB's to the commercial models, Nodal Ninja NN3 & Panosaurus, I am always ready to admit that mine is not universal,
it can't take all cameras. I have holes not slots. This means you can't get your camera out of position and it
is easier to make. However to show that it has a little versatility here are another couple of pictures of it.
|
![]() |
![]() |
![]() |
Nov. 2009. If you are into heavyweight full-frame DSLRs the Nodal Samurai can handle those too. Here is the Sony a850. All it required was an extra hole drilled in the swinging arm, a one minute job, even when back-packing around S.E. Asia, no need for a new model, NS5, eh ;-) |
Instead of spending hundreds of $$$ on a Nodal Ninja NN3 or NN5 and a Gitzo or Manfrotto tripod and ball head
I bought a $20 tripod in Singapore and modified it.
It does an adequate job. I made two significant mods. The first problem to correct was that when the tripod
pano-head was rotated the camera mounting screw was off centre. The second was to change the tripod head to
reduce the amount it intruded into nadir shots. My first solution to the off-centre camera mounting screw was a 'quick release adaptor'. That is a fancy name for a bit of wood which fits in the QR shoe, with a bolt stuck in it with Araldite ;-) |
![]() |
![]() |
The second and better solution which reduces the footprint in the nadir was to remove the quick release head that flips 90°.
I then drilled a new mounting hole, on centre and used Araldite to bond a 6mm nut beneath the hole.
Oh, I also added a scale in degrees for the rotation, but never use it.
![]() That's it! My Nodal Samurai panorama system for under $25, including buying the tripod. Not bad, Eh ? ;-) |
All panos being re-created to run under HTML5
On 12th Jan. 2021 Adobe discontinued Flash which was necessary for these panos.
I knew that there were problems with Flash and that its days were numbered but I was taken by surprise when
unexpectedly none of my Flash panos were working. They all needed to be re-created to run under HTML5.
Most of my panos were made 2007 - 2010 so I had lost many of the skills and all of the software had moved on
several times in those 10+ years. So it is quite a big job relearning and recreating them. At the moment I'm about
halfway through the replacements. Many of those that I have replaced have been done in a rush and all features are
not working well. Hopefully I'll get there in the end. My apologies for those that are not working.
|
![]() |
Going through my old panos replacing them with HTML5 panos has been interesting.
Many of my very early panos are technically terrible. My early days were before HTML5,
Flash, or QuickTime panos became established. I can't remember exactly what I used, but the key software was Panotools.
I did some photography in the 1970s, but very little after the mid-70s when family and job dominated my life.
I returned to photography in around 2004 when I bought a Nikon Coolpix 3100 compact, 3 Megapixels. That is what I used for my first panos.
It had auto exposure and auto focussing so the having images seamlessly stitch was difficult.
I eventually bought a secondhand Canon 350D and used that. At first I only had the standard lens. Several panos took around 100 images.
Another improvement has been in image processing. Now, using Photoshop, it's possible to lighten the shadows and reduce the highlights.
It is much easier, and better, than the 96-bit colour images for true HDR of old. . . . Back to those replacements.
|
A couple of panos using the Nodal Samurai. |
|
![]() A junk shop in Penang Click on the image to see a full-screen, high resolution panorama. |
Some sample panoramas |
![]() ![]() ![]() |
![]() Cheah Kongsi |
![]() Teo Chew Kongsi |
![]() ![]() |
Churches
|
![]() ![]() |
![]() ![]() |
Churches
|
![]() |
![]() UK photos |
![]() Overseas photos |